Windows: Determine the Last Reboot Date/Time of a Computer Windows Server 2003 and Windows XP:
Run the following at a command prompt:
net statistics server
The second line that is returned will look something like this:
Statistics since 11/12/2013 1:23:45 PM
which for the majority of cases* will be the server uptime.
* The value is actually the uptime of the Server service. Unless that service
has been restarted since server boot-time, which is not a common action,
it will be the same as the server uptime.
Windows Server 2008, Windows 7 and Windows 8:
Start Task Manager by right-clicking the Taskbar, click the Performance tab
and note the value for Uptime near the lower-right of the screen.
- or -
Run the following from a command prompt:
systeminfo | find "Time:"
The output will look something like this:
System Boot Time: 11/12/2013, 1:23:45 AM
Thursday, March 26, 2015

Friday, January 2, 2015
How to Install SNMP and Configure the Community String
How to Install SNMP and Configure the Community String
Plesk Servers > Dedicated Server
How to Install SNMP and Configure the Community String
Simple Network Management Protocol (SNMP) is used to by our monitoring system in order to collect detailed information about your server. While configuring SNMP, you may find that certain values are already preconfigured for you. This is by-design and allows us to ensure that your server is monitored properly. There are some settings that you will not be able to configure.
Configure an SNMP Agent and Community String in Windows 2008 R2
Source: https://support.managed.com/kb/a764/how-to-install-snmp-and-configure-the-community-string.aspx
Simple Network Management Protocol (SNMP) is used to by our monitoring system in order to collect detailed information about your server. While configuring SNMP, you may find that certain values are already preconfigured for you. This is by-design and allows us to ensure that your server is monitored properly. There are some settings that you will not be able to configure.
Configure an SNMP Agent and Community String in Windows 2012
- Log into your dedicated server using Remote Desktop
- Click on Windows Key > Administrative Tools > Server Manager.
- Click Manage > Add Roles and Features.
- Click Next > Next > Next > Next. Verify SNMP Services are installed. Click Cancel. (If SNMP had not been installed, contact Support.)
- Click on Windows Key > Administrative Tools > Services.
- Right click on SNMP Service and click on Properties.
- Click on the Security tab.
- Type your randomized 8 - 10 character connection string. Be sure to make it Read Only, not Read Write.
- Click on Add.
Configure an SNMP Agent and Community String in Windows 2008 R2
- Log into your dedicated server using Remote Desktop.
- Click on Start > Administrative Tools > Server Manager.
- Click on Features > Add Features.
- Verify SNMP Services are installed.
- Click on Configuration > Services.
- Right click on SNMP Service and click on Properties.
- Click on the Security tab.
- Type your connection string. Be sure to make it Read Only, not Read Write.
- Click on Add.
- Log into your dedicated serer using Remote Desktop.
- Click on Start > Control Panel > Administrative Tools > Computer Management.
- Expand Services and Applications, then click Services.
- Double click on SNMP Service.
- Click on the Security tab.
- Type your connection string. Be sure to make it Read only, not Read Write.
- Click on Add.
Source: https://support.managed.com/kb/a764/how-to-install-snmp-and-configure-the-community-string.aspx
Tuesday, October 7, 2014
Bat script to find out remote computer if running a 32-bit OS or a 64-bit OS.
This is a quick and easy way to verify if a remote computer is running a 32-bit OS or a 64-bit OS.
If you have trouble getting it to work, be sure you're using an admin command prompt (I've seen wmic not work from a regular command prompt)
1. Open notepad.
2. Copy and paste below and save as OSscript.bat or whatever you want. Enjoy
:Start
cls
@echo off
Echo.
Echo Remote OS Info (Verifying 32-bit or 64-bit)
Echo.
Set /P Computer=Enter the Computer Name:
If "%Computer%"== "" goto BadName
pause
wmic /node:"%Computer%" os get osarchitecture
pause
Goto End
:BadName
Cls
Echo.
Echo You have entered an incorrect name or left this field blank
Echo Please enter a valid Name or press Ctr-C to exit.
Echo.
Pause
Goto Start
:End
Credit
http://community.spiceworks.com/scripts/show/2169-remote-os-info-verifying-32-bit-or-64-bit
If you have trouble getting it to work, be sure you're using an admin command prompt (I've seen wmic not work from a regular command prompt)
1. Open notepad.
2. Copy and paste below and save as OSscript.bat or whatever you want. Enjoy
:Start
cls
@echo off
Echo.
Echo Remote OS Info (Verifying 32-bit or 64-bit)
Echo.
Set /P Computer=Enter the Computer Name:
If "%Computer%"== "" goto BadName
pause
wmic /node:"%Computer%" os get osarchitecture
pause
Goto End
:BadName
Cls
Echo.
Echo You have entered an incorrect name or left this field blank
Echo Please enter a valid Name or press Ctr-C to exit.
Echo.
Pause
Goto Start
:End
Credit
http://community.spiceworks.com/scripts/show/2169-remote-os-info-verifying-32-bit-or-64-bit
Wednesday, August 27, 2014
HOWTO to remove SSH Shell warning triangle on WMware ESXi 5
How to remove SSH Shell warning triangle on WMware ESXi 5
After enabling SSH on VMware host version 5, yellow triangle with exclamation point will be added next to the host name. "Alarms" tab will not display anything related to this. In order to disable this warning, select host and go to "Configuration | Software | Advance Settings | UserVars.SuppressShellWarning" and change value from 0 to 1.


Friday, July 18, 2014
Microsoft VSS writer troubleshoot - retryable
Problem: Symantec backup exec 2012 run a backup job and failed with vss writer error message. Login Exchange server => Open CMD => vssadmin list writers => saw Microsoft Exchange VSS writer in retryable error stage. This need to be "No error" and State: Stable in order for backup jobs tow ork.
When contact Symantec they said to restart the exchange server, yes it will temporarily solve it. BUT IT IS NOT THE ANSWER!!! and if you contact Microsoft they will point finger back and forth.
Solution: With many Google searches below are the possible links to fix your VSS problems without Exchange reboot but here is the solution that solved mines.
1) Make sure you ONLY have 1 exchange job running, another exchange job running will cause the VSS error.
2) Restart the Exchange Replication Service
Here are list of links that may solve your VSS error if the top solution didn't do it for you.
http://kb.macrium.com/KnowledgebaseArticle50010.aspx
http://telnet25.wordpress.com/2013/11/06/microsoft-exchange-vss-writer-is-in-a-failed-retryable-state/
http://careexchange.in/how-to-re-register-vss-volume-shadow-copy-service-in-windows-server-2008-r2/#comment-13369
https://exchangetimes.wordpress.com/tag/microsoft-exchange-replica-writer-showing-retryable-error/
When contact Symantec they said to restart the exchange server, yes it will temporarily solve it. BUT IT IS NOT THE ANSWER!!! and if you contact Microsoft they will point finger back and forth.
Solution: With many Google searches below are the possible links to fix your VSS problems without Exchange reboot but here is the solution that solved mines.
1) Make sure you ONLY have 1 exchange job running, another exchange job running will cause the VSS error.
2) Restart the Exchange Replication Service
Here are list of links that may solve your VSS error if the top solution didn't do it for you.
http://kb.macrium.com/KnowledgebaseArticle50010.aspx
http://telnet25.wordpress.com/2013/11/06/microsoft-exchange-vss-writer-is-in-a-failed-retryable-state/
http://careexchange.in/how-to-re-register-vss-volume-shadow-copy-service-in-windows-server-2008-r2/#comment-13369
https://exchangetimes.wordpress.com/tag/microsoft-exchange-replica-writer-showing-retryable-error/
Monday, June 9, 2014
SCCM 2012 SQL Server Backup Recommendations
SQL Server Backup Recommendations for Configuration Manager
In Configuration Manager 2012 SP1 and later, note that you have the ability to recover a site (secondary sites don’t count) using a standard, native SQL Server database backup.
From the following link: http://technet.microsoft.com/en-us/library/gg712697.aspx
“Configuration Manager can recover the site database from the Configuration Manager backup maintenance task or from a site database backup that you perform by using another process. For example, you can restore the site database from a backup that is performed as part of a Microsoft SQL Server maintenance plan.”
Why is this important?
The standard ConfigMgr backup task will simply copy all of the database data and log files to the backup folder location. During the SQL Backup task, you have the ability to specify compression for a database backup.
In a recent test on our Central CAS, a standard ConfigMgr backup task resulted in a SQL backup size of about 542 GB. The backup size using the native SQL backup, with compression was 59 GB in size! That is a huge savings in disk space. Given that a restore really only needs the database, using the native SQL backup task makes sense.
There have been a few questions on how to set this up, and what retention to use.
Here is a guide on setting up the back up task using the built in SQL Server Maintenance wizard.
Open Microsoft SQL Server Management Studio and connect to your ConfigMgr SQL Server instance.

Expand the Management node, right click Maintenance Plan. Choose New Maintenance Plan Wizard.

Click Next >
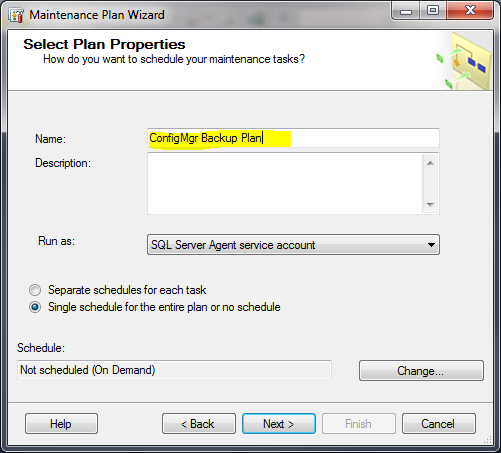
Change the name of the plan. To the right of schedule, click the Change button

Enable backups for at least every other day. Click OK. Then Next >
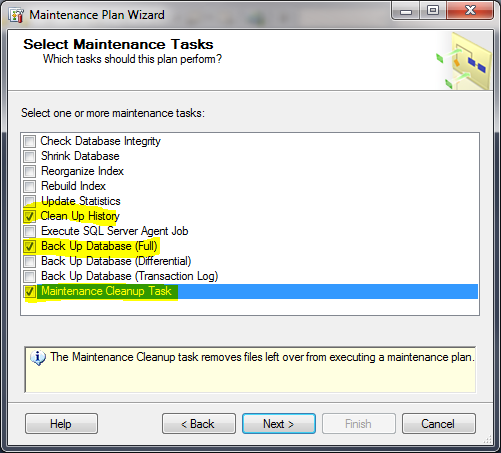
Choose the following three options, highlighted above, click Next >, then Next > again.

Since you will not want to use backups for recovery over 5 days old, change this setting to 1 week. Click Next >

Under Database(s) client the drop down
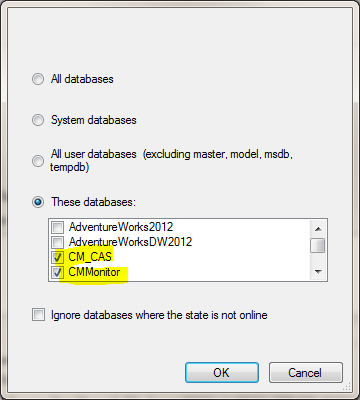
Select the database(s) you wish to backup. Got reportserver installed? Be sure to select those databases as well. Click OK

Change the backup folder location to an alternate folder or drive as applicable. Optionally, select the create a subfolder checkbox for each database. IMPORTANT: choose Set backup compression ‘Compress Backup’ to take advantage of compression. Click Next >

For the Define Maintenance Cleanup Task, you will select the folder that the backups are being written, file extension name, include first level folders and reduce the delete file settings to 1 week. Click Next>, click Next > again.

Click Finish to complete.
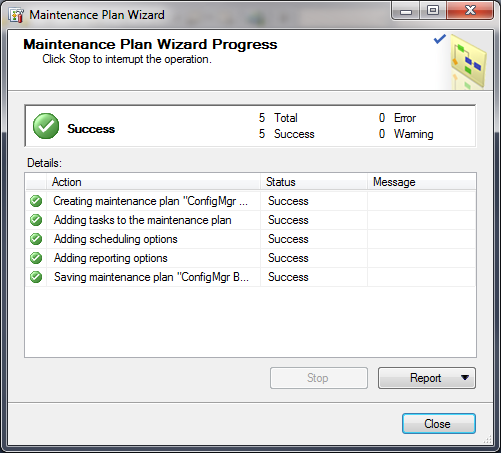
You should be rewarded with success. Time for a cold one.
After the next schedule run date/time Double check that the database backup was in fact created. And, it is always a good idea to periodically restore a backup to an alternate location as a way to test that this is a valid backup.

The article above is straight from Steve Thompson
http://stevethompsonmvp.wordpress.com/2013/06/07/sql-server-backup-recommendations-for-configuration-manager/
Tuesday, April 29, 2014
Upgraded Symantec Backup Exec 2010 R3 to 2012 SP4 over the weekend.
Objective:
1. Upgrade a CASO and 5 MMS servers from Backup Exec 2010 R3 to Backup Exec 2012 SP4
2. Make sure all the backup jobs are working and the old jobs are restorable.
3. Record the process for future references.
http://www.symantec.com/connect/videos/upgrading-be-2010-r3-be-2012
Result:
I was able to successfully upgrade my Symantec Backup Exec environment from 2010 R3 to 2012 SP4
1. Upgrade a CASO and 5 MMS servers from Backup Exec 2010 R3 to Backup Exec 2012 SP4
2. Make sure all the backup jobs are working and the old jobs are restorable.
3. Record the process for future references.
http://www.symantec.com/connect/videos/upgrading-be-2010-r3-be-2012
Result:
I was able to successfully upgrade my Symantec Backup Exec environment from 2010 R3 to 2012 SP4
Subscribe to:
Posts (Atom)