I thought I would write about how to deploy an exe file as a “msi deployment type”. In many cases you don’t have access to a MSI file but still want to deploy it with all the cool features that an msi deployment type has.
First you need to .exe file of theapplication you want to deploy, put it under a folder in your deployment share.
for example I want to deploy Notepad++ for myself and a couple of colleagues, I could use a msi packager and create a msi package from scratch but that takes time and its such a small application that I just want to deploy to a handful of people in the IT department.
First go to Software Library > Application Management > Applications and if you want to create a new folder called IT.
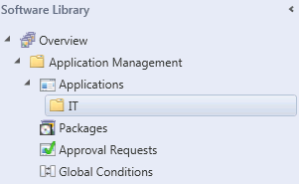
Right click the folder and choose “Create Application”
In the wizard click on “Manually specify the application information” and on the next screen input the application information
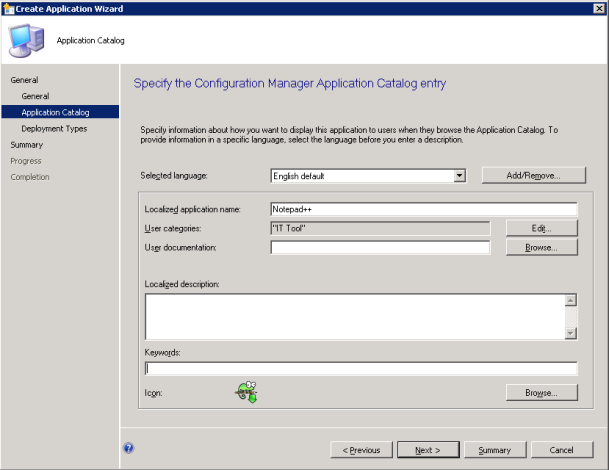
On the next screen select your language, Localized application name, User categories and browse to the .exe file to get the icon.
On the next screen press “Add..” this will open up a new window where we need to spevify all the information on the deployment type, so go ahead the choose “Manually specify the deployment type information”
Input a name for the application and choose language.
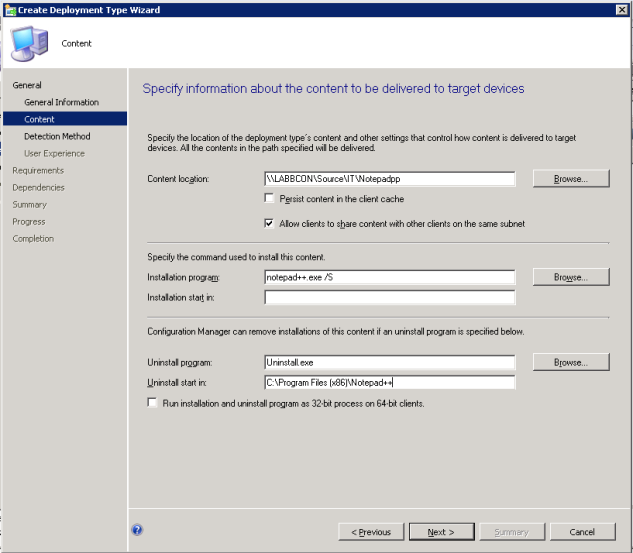
Now we need to input the installation information, first enter the location of the content. If you press “Browse” you will see that you can only pick MSI files so we need to manually input the installation command, in this case “notepad++.exe /S” if we want we can also specify the uninstall information, this is a little harder to find, in most cases there is a uninstall program in the installation folder, you could also check the registry for an uninstall command. In the screen below there is an error you need to type Uninstall.exe /S for it to uninstall silently.
Now press “Next”
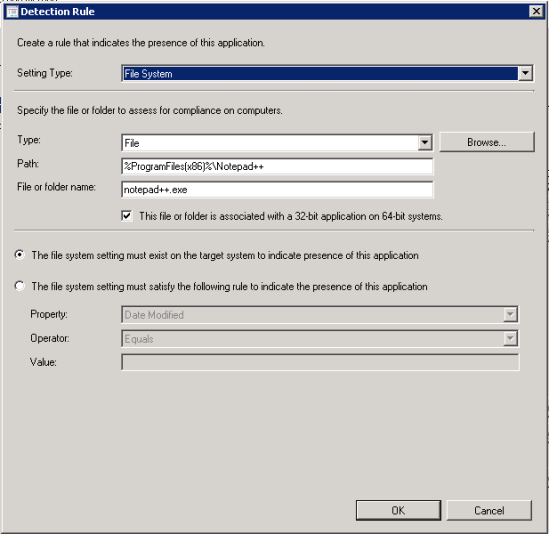
The next step is to input information so that Configuration Manager knows if the application is already installed on the device we deploy to. So go ahead and press “Add Clause…”
In this case we specify a file present on the device if it’s already installed, if this was a MSI file it would import the product code. There is also an option to input registry information. Press OK > Next
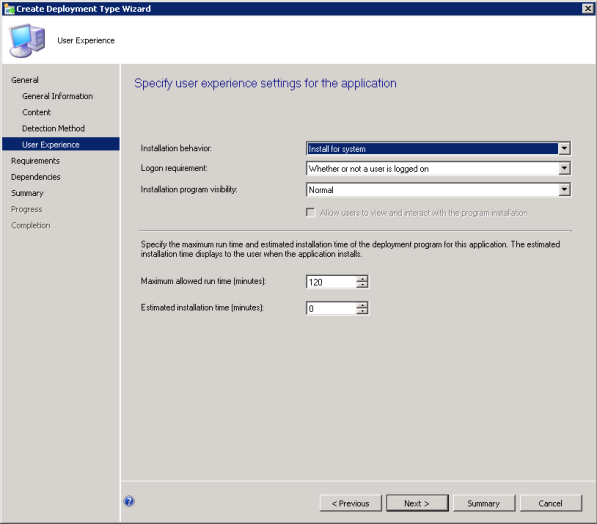
Next step is to specify installation behavior. As everyone here want Notepad++ as you can’t live without it I choose “Install for system” and ”Whether or not a user is logged on” the most obvious difference between “Install for system” and “Install for user” is that if you install for system it will show up under Software Center and install for user will show up under the Application Catalog site.
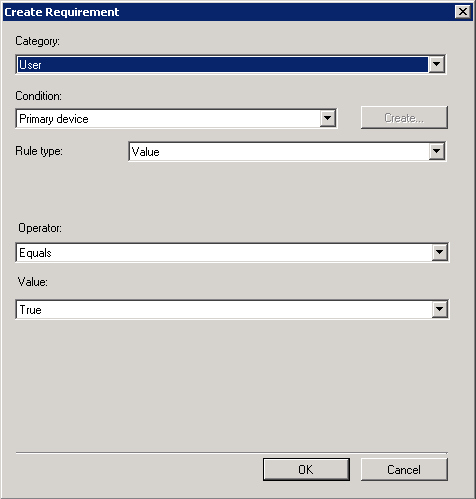
On the next screen you can specify Requirements, I only want to deploy this if the user is a primary user for the device. So press “Add…” if you want to you can also add other requirements such as disk space, operating system, OU or even create your own custom requirement with a registry key, SQL query or LDAP query.
Now press OK > Next
Next screen is for dependencies, as this has no we skip this and press next. This can be very useful if you for example deploy Adobe flash player for Firefox you can here specify that for it to install Firefox has to be present on the device as without it it’s pretty useless.
Click “Next” on Summary, we are not back on the Create Application Wizard so just press “Next” and we are done.
Now all you need to do is distribute the content to your DP and deploy it to a Device, User or Group.
First you need to .exe file of the
for example I want to deploy Notepad++ for myself and a couple of colleagues, I could use a msi packager and create a msi package from scratch but that takes time and its such a small application that I just want to deploy to a handful of people in the IT department.
First go to Software Library > Application Management > Applications and if you want to create a new folder called IT.

Right click the folder and choose “Create Application”
In the wizard click on “Manually specify the application information” and on the next screen input the application information
On the next screen select your language, Localized application name, User categories and browse to the .exe file to get the icon.

On the next screen press “Add..” this will open up a new window where we need to spevify all the information on the deployment type, so go ahead the choose “Manually specify the deployment type information”
Input a name for the application and choose language.
Now we need to input the installation information, first enter the location of the content. If you press “Browse” you will see that you can only pick MSI files so we need to manually input the installation command, in this case “notepad++.exe /S” if we want we can also specify the uninstall information, this is a little harder to find, in most cases there is a uninstall program in the installation folder, you could also check the registry for an uninstall command. In the screen below there is an error you need to type Uninstall.exe /S for it to uninstall silently.
Now press “Next”

The next step is to input information so that Configuration Manager knows if the application is already installed on the device we deploy to. So go ahead and press “Add Clause…”
In this case we specify a file present on the device if it’s already installed, if this was a MSI file it would import the product code. There is also an option to input registry information. Press OK > Next

Next step is to specify installation behavior. As everyone here want Notepad++ as you can’t live without it I choose “

On the next screen you can specify Requirements, I only want to deploy this if the user is a primary user for the device. So press “Add…” if you want to you can also add other requirements such as disk space, operating system, OU or even create your own custom requirement with a registry key, SQL query or LDAP query.
Now press OK > Next

Next screen is for dependencies, as this has no we skip this and press next. This can be very useful if you for example deploy Adobe flash player for Firefox you can here specify that for it to install Firefox has to be present on the device as without it it’s pretty useless.
Click “Next” on Summary, we are not back on the Create Application Wizard so just press “Next” and we are done.
Now all you need to do is distribute the content to your DP and deploy it to a Device, User or Group.
No comments:
Post a Comment